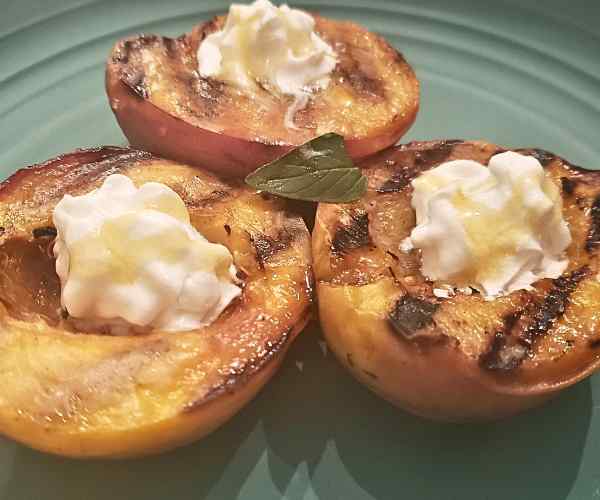
Curry-Chicken-Grilled-

Grilled Curried Chicken Thighs 

Curried Chicken Thighs

Curry comes in so many varieties and colors. For this Grilled Curry Boneless Chicken Thigh recipe we used a green Thai curry from a brand called Vitasia. The curry is mildly spicy which keep you craving another bite.
Prep Time 5 minutes
Cook Time 20 minutes
Marinate 30 minutes
Course Dinner
Cuisine Asian
Servings 4
Calories 405 kcal

Equipment

  • Grill or Grill Pan

Ingredients
  

  • 4 Ounces Thai Curry Paste
  • 1.5 Pounds Boneless Chicken Thighs

Instructions
 

  • Start with boneless thighs, we buy bone in thighs when they are on sale and debone them and store in the freezer until a day or two before we are ready to use them.
  • Mix approximately on ounce of curry paste per thigh and rub them all over
  • Grill on a medium direct heat for approximately 20 minutes or until the thermometer reads 165 degrees F

Video

Notes

We used Vitasia brand Green Thai Curry You may substitute another brand but check the calories as all curry pastes are not created equal.
Approximately 4 good sized thighs. We leave the skin on for these.

Nutrition

Calories: 405kcalCarbohydrates: 3gProtein: 28gFat: 30gSaturated Fat: 8gPolyunsaturated Fat: 6gMonounsaturated Fat: 13gTrans Fat: 1gCholesterol: 167mgSodium: 131mgPotassium: 349mgFiber: 1gSugar: 2gVitamin A: 4598IUVitamin C: 2mgCalcium: 53mgIron: 2mg
Keyword budget, chicken, easy, Spicy
Tried this recipe?Let us know how it was!
Copy of Salmon

Grilled Salmon w Homemade Herb Butter

Salmon has long been one of my favorite seafood options. Summertime is an especially great time to enjoy seafood of
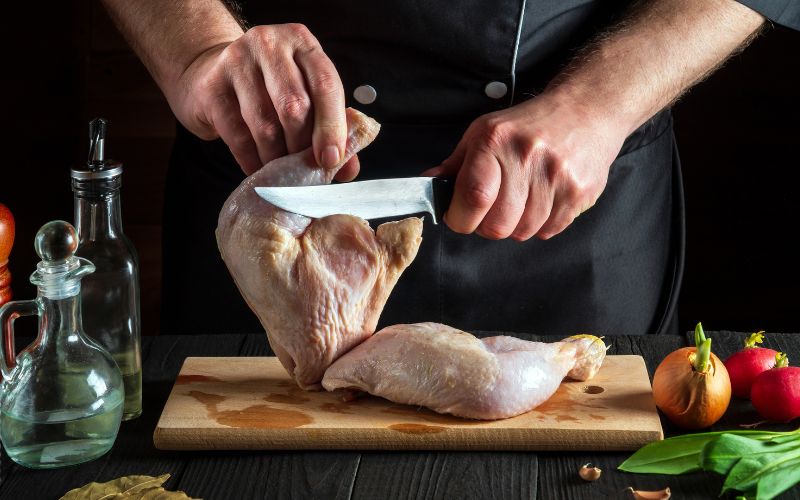
 any kind. It’s light, great for you, and super easy to prepare. U.S. dietary guidelines recommend we eat at least two servings of fish a week. It’s also loaded with heart-healthy, brain-boosting omega-3 fats.

I used to purchase the bag of frozen salmon fillets found in many grocery stores. Being a mom of two, it was easier because I was able to make them last for a longer amount of time.  I always baked them in the oven with a pat of butter on top with some salt and pepper. However, they never seemed to come out perfectly fork-tender and the seasoning was always watered down. I thought this was just as good as it would get!

Time for a change! I decided one day to be BOLD and try something new. What about using the GRILL? I made my husband use it frequently to grill chicken and steak. I can do this too!

Summertime was the perfect time to experiment this way – as we all try to use the oven as little as possible. It warms up the house and makes us feel hotter than need be – it’s already hot enough outside! 

Being the nutrition and foodie nerd that I am, I started to do some research.

It was time to start purchasing raw salmon fillets. Our lives were changed!

The two most popular types of salmon that you may see available in your local grocery store are Atlantic and Alaskan (sockeye). Atlantic salmon is a larger pale orange version that is usually more oily with a thick flesh and mild flavor. The Alaskan salmon has a deeper red color, is thinner, and has more of a rich taste. 

I find the Atlantic salmon to be a better crowd-pleaser – for kids and adults alike. Find a nice fillet with the skin still on! My favorite places to find this type of salmon are Wegmans and Lidl. I can usually get 4 to 6 two-inch-wide portions out of a large fillet. 

I knew any recipe I created needed to be LIGHT and FRESH. I also learned how hot to keep the grill, when to flip the fish, and just how much butter to add to get a great flavor. (Hint: it’s a lot of butter. Yum!)

Check out the recipe for my Grilled Salmon with Homemade Herb Butter below. I also have some tips to ensure you have great results!

3lb Atlantic Salmon Fillet, skin on, cut in two-inch-wide portions

½ stick of plant-based butter, softened (sub with your favorite cow’s milk butter option if desired)

2 tbsp fresh dill, minced

2 tbsp fresh parsley, minced

Salt and pepper to taste

Fire up the grill, setting it on medium-high heat, and allow it to reach temperature. 

Mince the fresh dill and parsley and mix it into your softened butter. Add salt and pepper to taste.

Once the grill is heated up, spray the grates liberally with cooking spray. I use a plant-based grill spray. [Use your favorite option – or simply whatever you have on hand! Please be careful as some spray oils may cause the fire to inflame quickly! Keep a safe distance when spraying!]

Slather some of the butter onto the flesh side of the salmon portions. Put the salmon on the grill FLESH side down first! 

Cover and let cook for about 5 minutes. Wait to flip onto the skin side until the salmon has cooked through about 2/3rds of the way. 

If the grill is hot enough, the flesh should NOT stick to the grates when you go to flip it over. Flip the salmon over onto it’s skin side and grill until cooked through. The center will be fork tender and no longer bright pink. 

Lather with more butter as it is finishing on the grill and add even MORE when you’ve pulled it off the grill. More butter is BETTER, duh. 

Pair it with some fresh grilled veggies – tips to come in a later post – and a nice glass of white wine! Enjoy!

Grilled Corn on the Cob

  • 6 Ears of Corn
  • 1 Tablespoon of Kosher Salt
  • 1 Tablespoon of Sugar

 I like a Chili Lime Butter (recipe below) but if you prefer yours plain, the grill will impart lots of flavor into the corn.  If you are looking for lots of smokey flavors, add a smoke box to your grill or if you have a smoker, by all means, cook it on the smoker.

Chili Lime Butter Recipe

  • 1 Stick of Butter
  • 1 Teaspoon of Chili Powder
  • 1 Teaspoon of Cayenne Pepper
  • 1 Cup of Butter
  1. Pull some of the silk and husk off but not all of it.
  2. This will add flavor, help the corn steam,  and protect it from burning.
  3. Fill a small tub or clean sink filled with cold water.
  4. Add the salt and sugar.
  5. Soak the corn cobs for at least 30 minutes and up to a couple of hours before grilling.

For The Chili Lime Butter 

Mix all the ingredients at room temperature or melt in the microwave (when melting butter in the microwave cut the butter into small pieces). 

Grilled Asparagus with Thyme

  • 1 Bunch of Asparagus
  • 1-2 Tablespoons of Olive Oil
  • 1 Tablespoon of Thyme
  • Salt and Pepper to Taste
  1. Wash the asparagus with water.
  2. Break the ends off the asparagus by holding each stock upright and bending, it will break where it becomes tender enough to eat.
  3. If you want your asparagus to be a bright green color, you should microwave them for 2-3 minutes on high and then plunge into an ice-water bath to cool them before grilling. Dry the stalks off before adding to the oil mixture.
  4. Place the dry asparagus, olive oil, and thyme into a baggie and let sit for at least 30 minutes ( I usually make mine up hours ahead of time since its one less thing I will have to do when grilling and serving dinner.
  5. Place the asparagus on the grill using either a grill pan or on the grate. If you place them directly, make sure you lay them perpendicular to the grate so they do not fall through. Rotate the asparagus every few minutes. Grill marks are good but do not burn or overcook.
  6. The asparagus is cooked properly when you pick it up holding the stalk and it starts to slightly bend in the middle.

Grilled Vegetable Medley

  • 3 Small Zucchini (chopped)
  • 1 Eggplant (chopped)
  • 2 Onions (chopped)
  • 1 Yellow Pepper (chopped)
  • 1 Red Pepper (chopped)
  • 1 Crown of Broccoli (chopped)
  • 10 Mushroom Caps (halved)
  • 2 Teaspoons of Fresh Garlic (minced)
  • 1 Tablespoon of  Italian Seasoning
  • ¼ Cup Olive Oil
  • 2 Teaspoons of Salt and Pepper
  1. Combine all the vegetables in a large bowl.
  2. Add the oil, garlic, salt, pepper, and Italian seasoning, mix together.
  3. Once mixed, put vegetables into one-gallon freezer bags until you are ready to grill.
  4. Turn the grill to medium-high heat.
  5. Using a slotted sheet pan (i use a disposable one). Empty the vegetables evenly into the pan and cook on the grill, turning every 10-12 minutes until brown and golden.

Eggplant Caprese

This is one of our summer vegetarian favorites. You can serve this as a meal, appetizer, or as a side dish.

  • 2 Eggplants (sliced thick) 
  • 1/4 Cup Olive Oil (and a bit more for brushing on the eggplant)
  • 1/4 Cup of Balsamic Vinegar
  • 1/4 Tablespoon of Salt
  • 10-12 Fresh Roma Tomatoes 
  • 4 Cloves of Garlic
  • 2 Balls of Fresh Mozzarella Cheese
  • 1 Half Cup of Fresh Basil

The trick to making eggplant is to set it out on towels (paper is fine) to let it dry for an hour before cooking it. 

  1. Sprinkle salt on a towel. 
  2. Slice the eggplant in thick slices 1/2 inch thick.
  3. Place on the towel and sprinkle more salt on the tops.
  4. Lay a second towel on the top.
  5. Cut the Roma tomatoes in half an scoop all the seeds out.  
  6. Chiffonade your basil and set aside.
  7. Slice the mozzarella cheese.
  8. Before grilling the eggplant drizzle or brush it with some of the olive oil (not too much or you will have a flare up on your grill). You can brush on a bit more as it is cooking. The eggplant absorbs it in quite well.
  9. Wrap the garlic (skin still on) in aluminum foil and drizzle with olive oil. Place it on the grill at a high level or off to the side. You want it to cook but not burn. 
  10. Place the tomatoes on the grill and keep a close watch on them they cook quickly. Turn them as needed. You want them to still be firm enough to pick up. You are only grilling them to reduce the acidity and bring out their flavor. 
  11. Eggplant is done when you can poke it with a fork and feel that it is no longer tough (like the consistency of a cooked potato).
  12. Rough chop your cooked tomatoes and place in a bowl. Set aside.
  13. Pinch or pull the garlic out of its skins and add it to the bowl (it should be mushy).
  14. Add in 3/4 of the basil,  reserving some for plating.
  15. Mix in your balsamic and olive oil.
  16. Add the salt to taste.
  17. Plate by placing the eggplant slice first, then the mozzarella, and then a scoopful of the tomato mixture. Sprinkle the top with a pinch of the fresh basil 

Reverse Seared Tomahawk Steaks

Tomahawk Steaks are basically a fancy ribeye. The bone that the steak is normally cut from, is left attached and frenched out.  They are usually sold in a thick cut as you see here.

We got these for a Father’s Day celebration.  My husband was quite pleased with the result. First, we smoked them, and then we did a reverse sear on our second grill. I made an herbed butter that we brushed over the top when they were being seared. 

  • 2 Tomahawk Steaks (special cut at the butcher)
  • Salt 
  1. Salt the steaks well
  2. Smoke with hickory wood for 25-30 minutes at 350 degrees F or until the internal temperature reaches 130 degrees F (for medium rare). This is all based on thickness and how cold the meat was when you put it on the smoker. You may have to modify a bit, but don’t overcook these lovely prehistoric looking steaks. 
  3. Drop on to a preheated, clean grill on medium-high heat and sear both sides by brushing on the herb butter as you sear each side. Watch for flare-ups, some are okay. 

Serve with your favorite salad and potato it’s a meal fit for a king! 

Cowboy Ribeye Steaks on the Smoker

Yippee Ki yay we are having some good-old, melt-in-your-mouth Texas cowboy rib-eye steaks on the smoker today. This is a huge piece of meat and needs to be salted and smoked on indirect heat. We used hickory and it was wonderful. Once it was done we brushed some garlic-herb butter on top and yes, it was as good as it looked! 

  • 1 Tablespoons of Salt 
  • The Cowboy Rib-eye Steak (one steak was more than enough for two) 
  • 3- 4 Tablespoons of Butter 
  • 1 -2 Cloves of Garlic 
  • 2 Sprigs of Fresh Rosemary and or Parsley
  1. Salt the steak and let it sit out for an hour before smoking.
  2. Set your smoker to an indirect heat but only cover half or your grill with the heat reflector. (If you do not have this option be prepared to grill it on another grill). 
  3. Smoke until temp reaches 130 degrees
  4. Melt the butter garlic and herbs and brush the steak and grill it on either side at a high heat to produce a slight char on the outside. 
  5. Enjoy! 

How to Spatchcock a Chicken

Spatchcocking is simply just another name for butterflying, but it’s more fun to say and it certainly sounds impressive. When it comes to a whole chicken you actually are applying an advanced technique that requires you to know the bone structure of the bird.  It’s more involved than just butterflying a piece of shrimp or a boneless chicken breast. 

Why do we use this method? It is desirable in grilling or roasting food since you can cook it in less time and more evenly.  If you have ever sat a whole chicken on your grill or smoker it may have turned out fabulous. But now instead think about how nice and crispy  you could get the skin if it was closer to the heat source.  This is another reason why I like this spatchcock method. 

Mititei- Romanian Street Food

The most popular and delicious Romanian street-food is Mititei (or “Mici” which means “little ones”). Other Balkan countries have similar deliciousness, called differently and using a few other spices, but for now, I will share the Romanian style recipe that I tried and love. You can combine beef and pork and lamb and veal, or you can choose just 2 kind of ground meat. I personally prefer beef and pork, other love the beef and lamb combo, but, your choice. Also, it would be best if you have a charcoal grill to cook them on because the smoke of the charcoal grill will double the flavor. They are best parred with a cold beer of your choice, mustard and sourdough bread. Totally up to you.

So, let me tell you the Mititei story.

What you’ll need:

-2 lb ground beef

-1 lb ground pork

-1 lb ground lamb (optional)

– 1 cup beef stock (low – sodium)

– 3-4 minced garlic cloves;

– 1 ½ tsp fine ground black pepper;

– ¾ tsp fine ground thyme;

– 1 tsp ground cumin;

– 1 tsp ground coriander;

– 1 tsp paprika;

– 1 tsp baking soda;

– 1 tsp salt.

How it’s done:

Combine all ingredients except for the baking soda and the beef stock. If you have a good mixer, like a KitchenAid standing mixer, you’re lucky, but if not, sorry, you’ll have to mix the meats and spices together using your hands for about 30 minutes. Great workout! Also, it gives you an excuse to eat more of these 😊 Slowly, add the beef stock and when you’re almost done, you will add the baking soda, which makes them fluffy, and keeps their natural color and freshness.

After you are done mixing, press the mixture in the bowl to make sure there aren’t any air bubbles and cover it with some plastic wrap to prevent air from coming in. The secret is to leave this mix in the refrigerator for about 12 hrs or overnight, for all the spices and aroma to work together and surprise you with the best flavor.

Once you’re ready to cook them, start making little sausages using your hands, about 2 inches thick and 4 inches long and have them ready on a plate. Get the grill ready on high and when you cook them, make sure you watch them closely, sometimes the fat dripping can start a little fire. As for the grilling time, it’s up to you, around 3-4 minutes on each side, 4 sides.

Get the beer ready and enjoy with friends and family!

Shish kabob

  • 1 Lb. of Chicken Breast (cubed)
  • 1 Lb. of Steak NY Sirloin or Steak Tips (cubed)
  • 1 Container of Cherry Tomatoes(rinse and dry)
  • 1 Container of Mushrooms (rinse and dry)
  • 1 Squash (green or yellow, rinse, dry and cube)
  • 1 Pepper (cubed)
  • 4 Tablespoons of Olive Oil
  • 2 Tablespoons of Balsamic Vinegar
  • 1 Tablespoon of Dijon mustard
  • 3 Cloves of Garlic (minced)
  • ½ Teaspoon of Crushed Red Pepper Flakes
  • 2 Teaspoons of Italian Seasoning
  • 1 Teaspoon of Black Pepper
  • 1 Teaspoon of Salt
  • 12 Wooden Skewers (soaked)
  1. Soak the skewers in water for 30 minutes.
  2. Cut and put all vegetables in a bowl together.
  3. Cut and put the chicken in a separate bowl and then the red meat in a separate bowl, while you prepare the marinade.

Marinade:

  1. Add all the wet ingredients together, everything that was NOT a vegetable or meat. (oil, vinegar, mustard, garlic, pepper flakes, Italian seasoning, salt, and pepper).
  2. Pour the marinade all over the 3 bowls evenly, marinate for 2 hours before cooking.

(If you wanted to do this a day ahead of time, just put each mixture into a gallon size freezer bags instead of a bowl & put in the fridge.)

Add your choice of meats and vegetables on your pre-soaked skewers and grill.