opt pickled shrimp

Pickled Shrimp

Pickled Shrimp

Easy to make, a savory taste that makes you want to come back for another bite, and does not require a lot of time. Make this for your next gathering instead of shrimp cocktail. Your guests will rave about this dish for a long time.
Course Appetizer

Ingredients
  

  • 1 Lb. of Raw Shrimp
  • 2 Lemons sliced
  • 1 Large Onion
  • 1 Tablespoon of Your Favorite Seafood Boil I purchased mine at the spice store
  • ½ Cup of White Vinegar
  • ½ Cup of Olive Oil
  • 1 Teaspoon of Salt
  • ½ Teaspoon of Salt for the Boiling Water

Instructions
 

  • Remove head and peel the shell and legs (I leave the tail on)
  • Devein shrimp if not already purchased this way
  • Boil a pot of lightly salted water (½ teaspoon of salt)
  • Add the shrimp along with half of the onion and slowly stir as they will boil up and foam
  • Reduce the heat and simmer for 3-4 minutes until the shrimp turn slightly pink
  • With a slotted spoon transfer the shrimp to an ice bath (If you get some of the onion in the bath that is fine)
  • Slice the lemon and the rest of the onion in thin rings
  • In a mason jar layer the lemon and some raw onion and then some shrimp and a sprinkling of your seafood boil. Repeat until all are gone.
  • Add the teaspoon of salt
  • Add the oil and vinegar
  • Place the lid on the jar and shake a few times
  • Place this in the refrigerator for a minimum of 8 hours
  • Make sure the shrimp is covered. If you need to, add a little water and more of the olive oil and vinegar mix to the brine.

Notes

Note This is not a canning recipe. Although the shrimp will be pickled, this is not meant for storing and will not be shelf stable. They are meant to be stored in the fridge and eaten with in a day or two. 
Tried this recipe?Let us know how it was!
  • 1 Lb. of Raw Shrimp 
  • 2 Lemons (sliced) 
  • 1 Large Onion 
  • 1 Tablespoon of Your Favorite Seafood Boil (I purchased mine at the spice store) 
  • ½ Cup of White Vinegar 
  • ½ Cup of Olive Oil 
  • 1 Teaspoon of Salt 
  • ½ Teaspoon of Salt for the Boiling Water
  1. Remove head and vein from shrimp if not already purchased this way
  2. Peel the shell (I leave the tail on) 
  3. Boil a pot of lightly salted water (½ teaspoon of salt) 
  4. Add the shrimp along with half of the onion and slowly as they will boil up and foam
  5. Reduce the heat and simmer for 3-4 minutes until the shrimp turn slightly pink
  6. With a slotted spoon transfer the shrimp to an ice bath (If you get some of the onion in the bath that is fine)
  7. Slice the lemon and rest of the onion in thin rings
  8. In a mason jar layer the lemon and some raw onion and then some shrimp and a sprinkling of your seafood boil.  Repeat until all are gone. 
  9. Add the teaspoon of salt 
  10. Add the oil and vinegar
  11. Place the lid on the jar and shake a few times
  12. Place this in the refrigerator for a minimum of 8 hours 
  13. Make sure the shrimp is covered if you need to add a little water and more of the olive oil and vinegar mix to the brine. 

Enjoy!

marinated baby bella opt

Marinated Baby Bella Mushrooms

Marinated Baby Bella Mushrooms

This recipe makes a large batch for a party. If you love mushrooms make these to keep eat over a few days.

Ingredients
  

  • 3 8 Oz. Packages of Whole Baby Bella or White Mushrooms Try to select bite-sized mushrooms if some in the package are very large I half them to create a bite-size.
  • 1 Cup Red Onion
  • ½ Cup White Vinegar
  • ½ Cup Apple Cider Vinegar
  • 1 Cup Olive Oil
  • Cup Brown Sugar
  • 1 Tablespoon Italian Seasoning
  • 1 Teaspoon Red Pepper Flake
  • ½ Teaspoon Salt
  • 2 Cloves of Garlic Minced optional

Instructions
 

  • Fill a pot with water
  • Add mushrooms to the water and bring to a boil and reduce to a simmer with the lid off for 3 minutes.
  • Scoop out the mushrooms with a slotted spoon
  • Plunge the mushrooms into a bowl of ice water.
  • In your jar combine the white vinegar, apple cider vinegar, brown sugar, and salt.
  • the raw onion, garlic, and Italian seasoning
  • When the mushrooms are cooled add to your Mason jar
  • Fill jar and gently shake with all the ingredients.
  • Put on the lid and shake gently to incorporate all the seasoning

Video

Notes

You can eat these after 2 hours and can last for several days in the refrigerator, covered tightly. Make sure the mushrooms are covered.  If you need to add a little water or more of the olive oil and vinegar to the already cooked brine.
Enjoy! 
Tried this recipe?Let us know how it was!

Ingredients

This recipe makes a large batch for a party. If you love mushrooms make these to keep eat over a few days.

  • 3, 8 Oz. Packages of Whole Baby Bella or White Mushrooms (Try to select bite-sized mushrooms if some in the package are very large I half them to create a bite-size).
  • 1 Cup Red Onion
  • ½  Cup of White Vinegar
  • ½ Cup of Apple Cider Vinegar
  • 1 Cup of Olive Oil
    ⅓ Cup of Brown Sugar
  • 1 Tablespoon Italian Seasoning
  • 1 Teaspoon Red Pepper Flake
  • ½ Teaspoon Salt
  • 2 Cloves of Garlic Minced (optional)

Instructions

  1. Fill a pot with water
  2. Add mushrooms to the water and bring to a boil and reduce to a simmer with the lid off for 3 minutes.
  3. Scoop out the mushrooms with a slotted spoon
  4. Plunge the mushrooms into a bowl of ice water.
  5. In your jar combine the white vinegar, apple cider vinegar, brown sugar, and salt.
  6. the raw onion, garlic, and Italian seasoning
  7. When the mushrooms are cooled add to your Mason jar
  8. Fill jar and gently shake with all the ingredients.
  9. Put on the lid and shake gently to incorporate all the seasoning

Can eat after 2 hours and can last for several days in the refrigerator, covered tightly. Make sure the mushrooms are covered.  If you need to add a little water or more of the olive oil and vinegar to the already cooked brine.

Enjoy!

Watch How To Make It

Breakfast Quesadillas

  • 6 Eggs
  • ¼ of a Small Onion Sliced
  • 6 Ounces of Sharp Cheddar Cheese (sliced)
  • ¼ Cup of Black Beans (canned)
  • ½ Cup of Salsa
  • 4 Slices of Bacon
  • 4 Flour Tortillas
  • ½ of an Avocado Sliced
  • Cilantro for Garnish
  • 4 Slices of Jalapeno (optional)
  1. Cook the bacon and set aside
  2. Drain the grease into a ramekin and let it settle
  3. Wipe the pan to remove any charred bits
  4. Add back a teaspoon of the bacon fat
  5. Place the sliced onions in the pan over medium-low heat and let them cook slowly
  6. Rinse and drain the black beans
  7. Add them to the pan with the onion
  8. Add ½ the salsa to the pan by dropping dollops of it all around
  9. Mix the eggs with a whisk until bubbly
  10. Add the eggs to the pan also
  11. Cook like you would an omelet scraping down the sides of the pan with a spatula and lifting the cooked egg. (Don’t worry if you can never get an omelet to look perfect, this is all hidden inside the quesadilla.)
  12. Heat a second pan on medium-high and pour some of the bacon-grease into it- just enough to coat the bottom, you do not want greasy quesadillas.
  13. While the pan is heating, divide the egg mixture in half and flip it.
  14. Place a little of the cheese in the egg mixture and most of it on the tortilla
  15. Scoop half the egg mixture onto the first tortilla and top it with another tortilla.
  16. Press down and hold it for a moment, (you can then place a press on it or another heavy bottom pan).
  17. Check for browning on the bottom, when you think it is perfect flip it and brown the other side.
  18. Repeat for the second quesadilla.
  19. Slice into quarters and serve with the avocado, bacon, cilantro, and jalapeno.
  20. Place the rest of the salsa in a separate bowl for spooning over as desired.

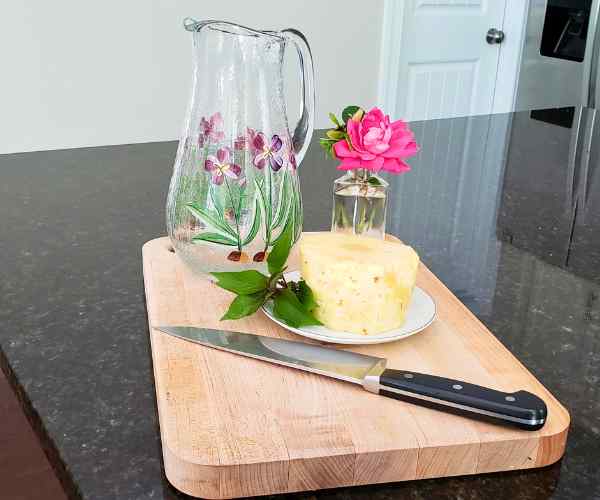
Refreshing Pineapple Water

  • 1 Half of a Fresh Pineapple (skin and spines removed)
  • 2 Quarts of Cold Fresh Water
  1. Add the pineapple to your pitcher in slices large enough so that they will not fall into the glasses when pouring. 
  2. Add the water and let it sit for 24 hours 
  3. You may keep adding water as you need to fill the pitcher throughout the week. 
  4. Discard the water and fruit as it begins to breakdown, usually after 5-6 days. 


A Spring BBQ Contest

A Spring BBQ Contest and a Pig Pickin

It is springtime in the south and nothing says spring has arrived better than the number of outdoor fun-filled, food events in March.  We started the month by attending Jimbo’s Annual BBQ competition. It is held just up the road from me at Stonewall Farm. The proceeds from the event in 2018 went to Operation HomeFront helping local military veterans. This year 2019 it will go to Carolina Calvary who was formed to help the NC hurricane victims.

We thought we would pop in for a quick pulled-pork sandwich since we had reservations for dinner later that night. Ha, lol, let me tell you that for a mere $20.00 donation we sampled over 20 types of bbq goodness. Sample sizes were large enough to plate a full sandwich. We decided as soon as we tasted the first sample that canceling dinner reservations that evening would be a wise decision.

It wasn’t just lots of food, it was really good quality BBQ. This is a pitmaster competition to outdo the other contestants for the accolades and small cash awards that come along with them for the best smoked pork, chickens, ribs, and brisket. These people were serious and it showed. Many had to arrive up to 30 hours ahead of time to set up and start their cook.

They had all kinds of camping trailers, fire pits, music, lights and outdoor kitchen set ups. We saw blenders, food processors, cleavers and some serious chopping blocks. They came as families with their kids, spouses and even some four legged friends. At one of the set-ups called Pappy’s Legacy BBQ out of Four Oaks, NC we realized it was two young teen boys who smoked the delicious pulled pork. They do this to honor their grandpa and apparently, they are not novices to this circuit. Their mom was present, but in the background to supervise from afar. Their BBQ was very good and there is no doubt in my mind that these boys will have their own cooking show one day.

The smell that was wafting through the entire event was incredible. If you have ever smoked anything you know the aroma that one grill produces. Now multiply that by 36. What they were using to smoke was very different from each other while some mixed the woods, others used no wood at all – just charcoal. Some were smoked on more traditional smoker grills and we even saw contestants that had 50-gallon drums turned upright with cool paint on them.

We had the opportunity to chat with the pitmasters about their techniques and equipment they use to learn why they selected it. We got to hear how vested they are in this competition. One man told us that it cost him $1000.00 to be there. A few were being sponsored by charcoal companies and some by the companies that make the sauce and rubs. It was fascinating for me to learn about this subculture.

Aside from all the amazing pulled pork we also had chicken wings, brisket, slaw, and some greens. We drank craft beer from a local brewery and listened to some great live music. We made our way around the event and stopped at some vendors selling their handmade wares. I bought a welcome sign for the front of my house. We were so full when we got home, we did not move from the couch. Looks like the big winners, were Fat-Heads BBQ, Smoke ‘n’ Barrels and North Meets South.

All in all, it was a great time and we will be going back next year for sure!

Two weeks later it was time to attend another outdoor event. This time the weather was milder and the sun was bright. This was tailgate/pig-pickin to celebrate with our friends for the 4th-year business anniversary of D’s Bottle Shop. The guest of honor (the pig) arrived already smoking on the grill being pulled by a pickup. I love the south! (sorry I was not there early enough to get the picture of it before it was hacked up.)

Dee and Allison were busy chopping Q all afternoon while Susan and Russ poured beer with a smile for all the guests. The live music was played by Lake Chamberlain. Our friend, John, is in the band. I got some video of them and they were fun to watch and listen to.
People danced and relaxed in the sun, filled their bellies with pulled pork sandwiches with slaw (I made an Eastern NC vinegar based BBQ sauce to share) and my friend Aaron made his amazing fermented BBQ sauce (I hope one day he will share the recipe with us).  

All in all, it was a great way to start the spring season with full tummies, good memories, daylight savings, warmer days, blooming flowers and outdoor fun food events.

Deviled Eggs

  • 6 Hardboiled Eggs (peeled and sliced in half)
  • 1 Tablespoon of Mayonaise 
  • 1 Teaspoon of Dry Mustard
  • 1/2 Teaspoon of Paprika (a little more for sprinkling on top)
  • 1/4 Teaspoon of Dry Parsley (for sprinkling on top)
  • 1/2 Teaspoon of Prepared Horseradish
  • 1/2 Teaspoon of Worcestershire Sauce 
  • Salt and Pepper to Taste
  1. Boil a pot of water,  carefully add the eggs once the water is boiling. 
  2. Boil the eggs in the shell for 13 minutes then plunge directly into a cold ice bath. 
  3. Slice the eggs and remove the yolk to a bowl.
  4. Lay the whites of the eggs onto your serving dish.
  5. Mix all the ingredients with the yellow yolks and refill the eggs.
  6. Sprinkle with the parsley and some of the paprika.

Herb Butter Sauce

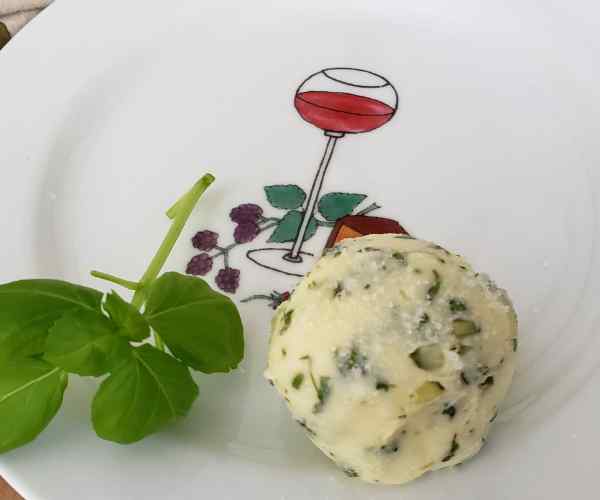
This lovely compound butter can be served room temperature or heated.  At room temperature, it is a wonderful spread and heated it becomes a lovely sauce. 

  • 3/4 Stick of Salted Butter (softened)
  • 1 Tablespoon of Fresh Rosemary (minced)
  • 3 Tablespoons of Fresh Parsley (minced)
  • 1 Tablespoon of Fresh Basil (minced)
  • 1 Clove of Garlic
  • 1/4 Teaspoon of Salt
  • 1/4 Teaspoon of Lemon Juice
  1. Mix together.
  2. Apply when your steak is still hot it will melt all over. Yum!

If doing a reverse sear on a steak

  1. Simply rub onto the steak just before the sear and it will help it to brown and crisp up nicely.

Tomato Caprese Frittata

  • 8 Medium Eggs
  • ¼ Cup of Milk
  • 1-1/2 Cups of Cherry or Grape Tomatoes (washed)
  • (You can use sliced if you remove seeds)
  • 1 16 Oz. Ball or Log of Mozzarella Cheese (Sliced)
  • ¾ – 1 Cup Fresh Basil (washed)
  • 2 Tablespoons of Parmigiano Reggiano (grated)
  • Cooking Spray for Pan
  • Salt and Pepper to Taste
  1. Preheat the oven to 350 degrees F.
  2. Spray a 9X13 or a 10X14 baking pan with cooking spray.
  3. Mix the eggs and milk together, pour into the pan.
  4. Add the tomatoes, mozzarella, and half the basil.
  5. Sprinkle the grated cheese on the top.
  6. Cook for 20 – 25 minutes until it does not jiggle on the top. 

Eggplant Caprese

This is one of our summer vegetarian favorites. You can serve this as a meal, appetizer, or as a side dish.

  • 2 Eggplants (sliced thick) 
  • 1/4 Cup Olive Oil (and a bit more for brushing on the eggplant)
  • 1/4 Cup of Balsamic Vinegar
  • 1/4 Tablespoon of Salt
  • 10-12 Fresh Roma Tomatoes 
  • 4 Cloves of Garlic
  • 2 Balls of Fresh Mozzarella Cheese
  • 1 Half Cup of Fresh Basil

The trick to making eggplant is to set it out on towels (paper is fine) to let it dry for an hour before cooking it. 

  1. Sprinkle salt on a towel. 
  2. Slice the eggplant in thick slices 1/2 inch thick.
  3. Place on the towel and sprinkle more salt on the tops.
  4. Lay a second towel on the top.
  5. Cut the Roma tomatoes in half an scoop all the seeds out.  
  6. Chiffonade your basil and set aside.
  7. Slice the mozzarella cheese.
  8. Before grilling the eggplant drizzle or brush it with some of the olive oil (not too much or you will have a flare up on your grill). You can brush on a bit more as it is cooking. The eggplant absorbs it in quite well.
  9. Wrap the garlic (skin still on) in aluminum foil and drizzle with olive oil. Place it on the grill at a high level or off to the side. You want it to cook but not burn. 
  10. Place the tomatoes on the grill and keep a close watch on them they cook quickly. Turn them as needed. You want them to still be firm enough to pick up. You are only grilling them to reduce the acidity and bring out their flavor. 
  11. Eggplant is done when you can poke it with a fork and feel that it is no longer tough (like the consistency of a cooked potato).
  12. Rough chop your cooked tomatoes and place in a bowl. Set aside.
  13. Pinch or pull the garlic out of its skins and add it to the bowl (it should be mushy).
  14. Add in 3/4 of the basil,  reserving some for plating.
  15. Mix in your balsamic and olive oil.
  16. Add the salt to taste.
  17. Plate by placing the eggplant slice first, then the mozzarella, and then a scoopful of the tomato mixture. Sprinkle the top with a pinch of the fresh basil 

Cucumber Salmon Bites

This is a perfect appetizer for summer or anytime. My neighbors actually made these wonderful little appetizers that allow you to snack guilt free. Salmon is loaded with nutrients and cucumber is hydrating. 

  • 2 English Cucumbers (peeled and cut into 1″ – 1 and 1/2 circles_
  • 8 Ounces of Smoked Salmon (sliced and cut into bite sized strips)
  • (1) 8 Ounce Package of Cream Cheese (softened)
  • 1/2 tablespoon Horseradish
  • 1/2 Teaspoon of Lemon Zest
  • 1/2 Teaspoon of Lemon Juice
  • 1 Tablespoon of Capers( optional)
  • Fresh Dill Sprigs for Topping
  1. Trim ends from cucumbers and cut into bite-sized rounds. Scoop into one side of each with a spoon, forming a small cup. Drain cucumbers, scoop sides down, on paper towels for 15 minutes.
  2. Mix the cream cheese, lemon zest, lemon juice, horseradish and capers if you decided to use them together in a bowl. Spoon 1/2 teaspoon cheese mixture into each cucumber cup. Top each cup with 1 salmon strip and 1 dill sprig.
Sliced red tomatoes with alternating slices of mozzarella cheese

Caprese Salad w Balsamic Reduction

Sliced red tomatoes with alternating slices of mozzarella cheese

Caprese Salad w Balsamic Reduction

What can be more delightful than freshly sliced tomatoes with basil and light mozzarella cheese drizzled with a balsamic reduction? So simple yet a dish everyone enjoys. Especially in the summer when tomatoes and basil are abundant.

Ingredients
  

  • 2 Vine Ripe Tomatoes
  • 6 Leaves Fresh Basil
  • 1 Ball Fresh Mozzarella Cheese
  • Salt and Pepper
  • Serve with a Balsamic Vinegar Reduction

Instructions
 

  • Wash and slice tomatoes
  • Slice the fresh mozzarella cheese ¼” thick, layer and fan out.
  • Wash basil and pat dry with a towel.
  • Layer leaves on top of each other and roll like a cigar. Hold together and slice very thin.
  • Sprinkle some basil and drizzle the cooled balsamic reduction.

Notes

Get the recipe for Balsamic Reduction
Tried this recipe?Let us know how it was!